


40% Layout Keyboard User Guide
When people first encounter a 40% layout keyboard, their first question is often, "How do you type on this thing?" This is the main reason why I am writing this article today, hoping that more people can learn about the 40% layout keyboard. This article also serves as an introduction to 40% keyboards.
A 40% layout keyboard is not just small for being small. While maintaining efficient use, it can improve comfort and is ideal for lazy typists. Of course, the small size of the 40% keyboard, combined with its support for wired, Bluetooth, and dual-mode connectivity, makes it perfect for a portable keyboard. In addition to wired, Bluetooth, and dual-mode connectivity support, there are some features that are indispensable for a good 40% of layout keyboards (the following feature descriptions only apply to TMK/QMK firmware keyboards. YDKB has the same functionality, but there are slight differences in how the functionality is described. The picture demonstrations use YDKB due to the more intuitive nature of the editor).
In most commercial keyboards and some custom keyboards, the Fn function typically consists of two types: momentary layer switching and layer toggling, providing functionality switching and combination keys. However, in custom keyboards with TMK as the core, the functionality that Fn can display is not limited to these two types. In my opinion, a good 40% layout keyboard cannot simply use momentary or layer-switching functionality.
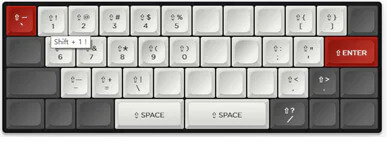
The logic of the "dual-purpose key: key, modifier key" and "dual-purpose key: key, momentary layer switching" functions is similar. When clicked once, it is a certain set key value (ENTER, SPACE, etc.). When held down, it opens the corresponding layer or continuously triggers the modifier key. When released, it returns to its original state. The difference between long-press and single-click is judged by the triggering event of the key press, and the firmware setting value is usually 200ms or 180ms. The "dual-purpose key: key, momentary layer switching" function is especially suitable for use with the Space key. I can output numbers 1-5 by long-pressing Space + qwert, and symbols can be outputted similarly with a single tap of the Space key without affecting normal Space output. Initially, the output of numbers may seem more complicated. Still, the potential benefit is that when performing this combination key operation, my palm does not need to move, and I can use the keyboard's positioning keys to locate, thereby improving the accuracy of blind typing numbers/symbols. This function takes time to adapt to, and some people may still have questions about how to long-press Space when using this function. This function does not conflict with long-pressing Space; simply long-press immediately after a single click to continue outputting Space. The sample of these functions can be seen in the following figure (using my own layer 0 configurations), with both Spaces using the "dual-purpose key: key, momentary layer switching" function (LT1 SPACE and LT3 SPACE). The two thumbs can control two different layers, and the key to the left of A is the "dual-purpose key: key, modifier key" function, with a long-press Ctrl function and single-click Caps Lock.
Layer 1 is opened by the left thumb.

The "Two-in-One: Key, Modifier Key" function allows me to combine "Ctrl+Caps Lock" or "Enter+Shift" into a single key. But what if we need to input "Shift+! 1" to output an exclamation mark? Do we have to press two or more key combinations on the 40% keyboard to achieve this? Not necessarily. We can use the advanced layer operation > Modifier Key + Momentary Layer, to achieve the output of two keys with a single press. An example of this is shown in the LM1 key in the image below.

The method I use is more complicated, combining the functionality of combination keys. For example, in Layer0, I use "LT7 Up", as shown in the following image.

The following image is Layer7 which complements the previous image of Layer0 with the LT7 Up function.
The above are the functions I commonly use, but the usage of the 40% keyboard is not limited to these. Apart from the functions implemented by compiling the firmware, using the logic of Raise/Lower in Planck is also feasible (it can be achieved by setting default layers or using layer toggling). The combination of various functions can make the 40% keyboard easier to use. The firmware provides a foundation, but how to use depends entirely on the user.
Summarize in a table:

4 Comments
No
No
No
No